ШираМаршрут
Оригинальный поход на западное плато Килиманджаро. Поездка на плато Шира, пересечь обширную пустошь, покорить стену Барранко и подняться на вершину через Барафу. Один из самых тихих и живописных маршрутов горы.
ОригиналЗападное плато
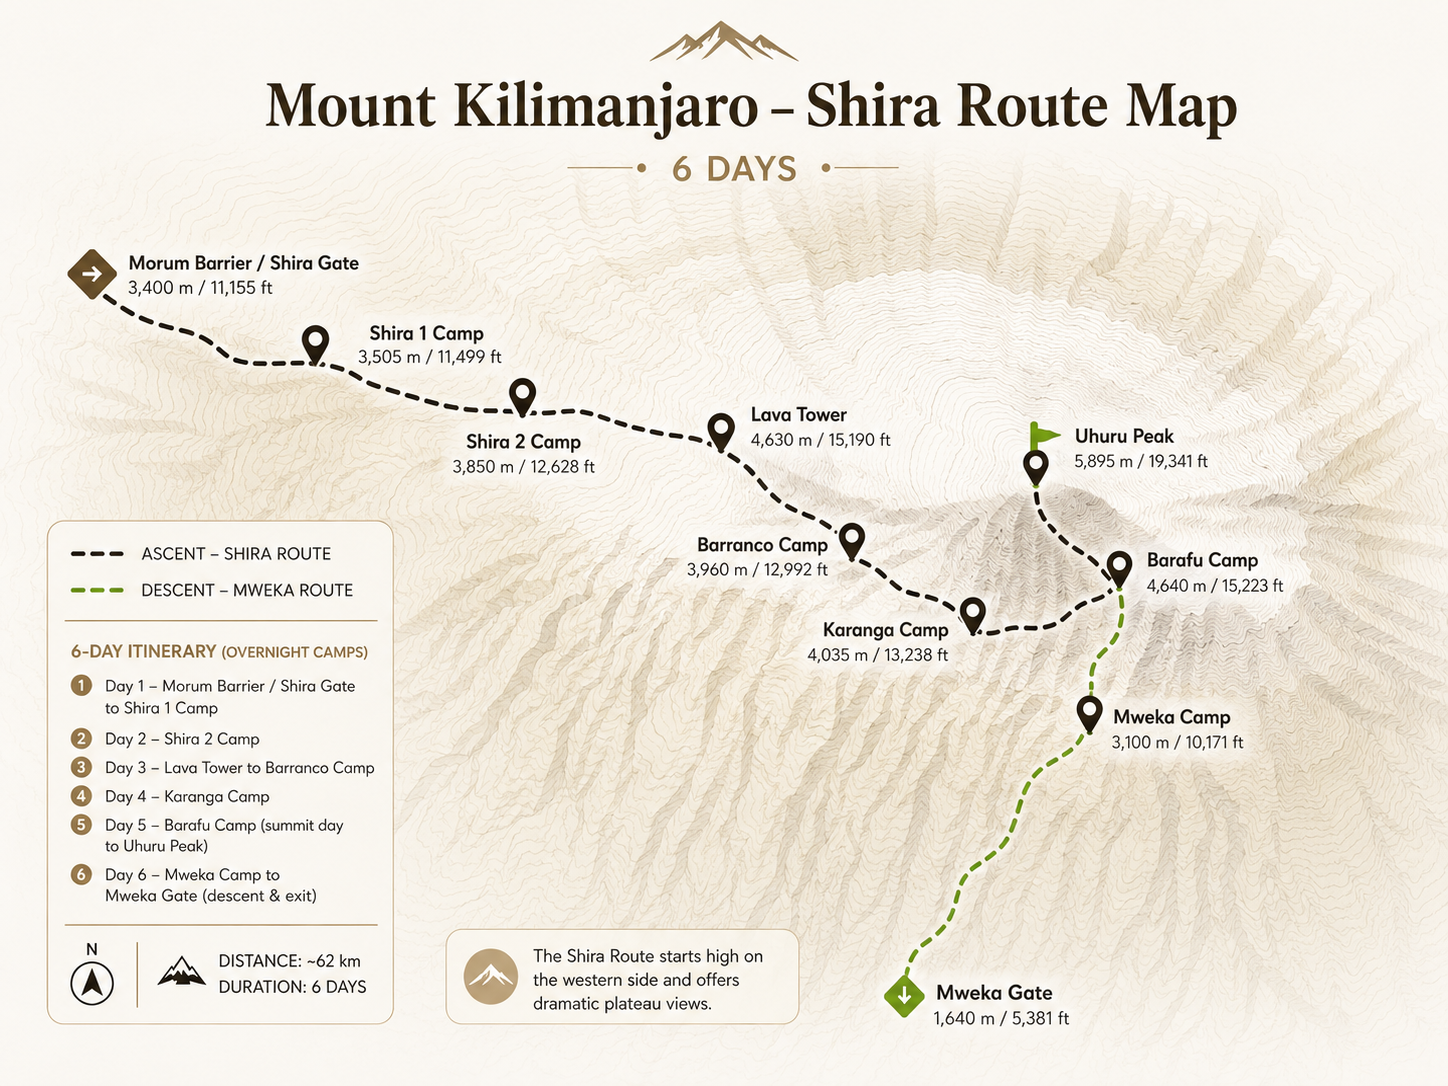
Маршрут Шира — это оригинальный западный подход к Килиманджаро. Предшественник ныне более популярного маршрута Лемошо и один из наименее посещаемых маршрутов на горе. Там, где Лемошо начинается в густом тропическом лесу у ворот Лондоросси, Шира идет по другому пути: после регистрации в Лондоросси вы продолжаете движение через национальный парк до барьера Морум (также называемого воротами Шира) на высоте 3414 метров. За лобовым стеклом остался тропический лес. Вы выходите на плато Шира уже на значительной высоте, и с первых шагов перед вами открывается полный простор вересковой пустоши и купола Кибо.
Это одновременно и определяющая особенность маршрута Шира, и его основная задача. Плато необычное. Древний, вулканический, огромный и красивый. Но прибытие сюда так быстро без постепенной акклиматизации в тропическом лесу означает, что ваше тело сразу же подвергнется воздействию значительной высоты. Дни 1 и 2 посвящены пересечению этого великолепного плато мимо впечатляющих шпилей собора Шира (3750 м) до лагеря Шира 2 (3840 м), где маршрут сливается с Лемошо, а вскоре после этого с маршрутом Мачаме. Начиная с третьего дня, маршруты идентичны: мощный день «поднимайся высоко, спи низко» к Лавовой Башне (4630 м) и вниз к Барранко, захватывающее восхождение на стену Барранко, траверс Южного круга под южными ледниками, лагерь Барафу и полуночный подъем на вершину к пику Ухуру (5895 м). Спуск осуществляется по маршруту Мвека.
Награда для подготовленных: два дня почти полного одиночества на одном из самых живописных плато Килиманджаро, а затем полный драматизм южного маршрута. Маршрут Шира подходит опытным путешественникам, которые хотят тихого, драматического западного подхода и готовы тщательно подготовиться к высокогорному старту. Вариант на 7 дней. С ночевкой в лагере Каранга. Настоятельно рекомендуется всем.
Это маршрут ШираПодходит ли вам?
- Необыкновенные пейзажи плато Шира. Обширная древняя вересковая пустошь, которую повидают немногие путешественники
- Очень мало людей, почти нет других туристов в дни 1-2.
- Ширинский собор. Впечатляющие вулканические шпили, уникальные для этого участка горы.
- Мощная акклиматизация в День 3. Лавовая башня (4630 м), цикл «поднимайся высоко, спи низко».
- Полный опыт Южного округа. Стена Барранко, южные ледники, долина Каранга
- Уникальный старт «До начала тропы». Эффектное прибытие прямо на плато.
- Второй кратчайший маршрут после Умбве. Эффективен для альпинистов с ограниченным временем и опытом.
- Большая стартовая высота (3414 м). Нет буфера для акклиматизации в тропическом лесу; риск ОГБ с 1-го дня
- Вероятность успеха ниже, чем у Лемошо. То же плато, меньше времени на акклиматизацию
- Соскучился по тропическому лесу Килиманджаро. Одна из самых красивых экологических зон горы.
- Не подходит для начинающих альпинистов без предварительной акклиматизации.
- Плато с самого первого дня очень подвержено сильным ветрам и холоду.
Маршрут Ширана карте

Визуальное руководство
ВысотаПрофиль
МаршрутМаршрут
Ваш маршрут Шира начинается иначе, чем почти любое другое восхождение на Килиманджаро: вы не идете к началу тропы. Вы едете туда. После формальностей регистрации у ворот Лондоросси автомобиль 4х4 продолжает движение через национальный парк по крутой, иногда неровной дороге, поднимаясь через лесную зону без остановки, мимо барьера Морум на высоте 3414 м, где вы припаркуетесь и начнете путь пешком. Многие альпинисты здесь выходят из машины. Уже на высоте более 3400 метров, впереди простирается обширное плато Шира, а над головой видна вершина Кибо. Это одно из самых ярких первых впечатлений от Килиманджаро.
Прогулка в первый день относительно короткая и плавная. Траверс длиной 4–5 км через пустоши и вересковые пустоши на западном плато, с широко открытыми видами во всех направлениях. Тропу окаймляют гигантские верески и вулканические скальные образования. Высота сразу заметна: воздух разрежен, солнце сильное, ветер может быть холодным. Всего через 2-3 часа вы прибудете в лагерь Шира 1 (также известный как лагерь Симба) на высоте 3610 метров. Ваша первая ночь на горе, которая уже выше, чем большинство маршрутов в день 3. Активно пейте жидкости, полноценно ужинайте и тщательно отдыхайте. Высота реальная с самого первого вечера.
Сегодня вы пересечете сердце плато Шира. Один из самых древних и впечатляющих пейзажей Килиманджаро. Плато когда-то было третьей вулканической вершиной, обрушившейся сотни тысяч лет назад в обширную открытую кальдеру, которую вы сейчас пересекаете. Тропа вьется на восток через вулканические породы, лавовые хребты и открытую вересковую пустошь, откуда на востоке вырисовывается все более четкий вид на вершину Кибо. Небо здесь огромное. Здесь почти нет растительности выше колена.
Центральным местом дня является Ширинский собор (3750 м). Великолепное скопление шпилей и контрфорсов вулканической породы, возвышающееся над дном плато, окруженное вершинами древней лавы. Это одна из трех вершин Килиманджаро и отдельный мир, который стоит исследовать. От собора тропа продолжается на восток до лагеря Шира 2 (3840 м). Куда прибывают участники маршрута Лемошо в свой третий день. Впервые на маршруте Шира у вас есть компания в лагере. Гиды проводят для всех тщательную проверку высоты. На плато часто скатывается послеполуденный туман. После ужина укладывайтесь спать и ложитесь спать как можно раньше.
Это определяющий день акклиматизации на маршруте Шира. День, который пойдет вам на пользу, если вы позволите. Тропа постепенно поднимается на восток от Ширы 2, оставляя плато позади и входя в высокогорную зону под ледниками Западного разлома. Яркой путевой точкой в начале дня является Зуб Акулы, поразительный вулканический шпиль. Тропа поднимается через редкую высокогорную растительность к Лавовой башне (4630 м). Огромная вулканическая пробка, возвышающаяся над осыпью, одна из самых знаковых достопримечательностей Килиманджаро.
Обед в Лавовой Башне. На высоте 4630 м ваше тело находится на самой высокой высоте. И это намеренно. Рядом с Башней участники маршрута Мачаме сливаются с юга, и отсюда тропа становится общей. Затем. Вместо того, чтобы тянуться выше. Тропа поворачивает на юг и круто и красиво спускается через необычайный лес Сенесио: гигантские крестовники, поднимающиеся из вересковой пустоши густыми гроздьями в доисторические времена. Спуск почти на 700 метров к лагерю Барранко (3950 м) – это чистая физиология высоты в действии. «Поднимайся высоко, спи низко». Производство красных кровяных телец усиленно работает. Сегодня вечером ваше тело более акклиматизировано, чем было бы без этого дня. Лагерь Барранко эффектно расположен под Стеной Барранко.
На 6-дневном маршруте сегодня самый длинный и трудный день в горах. Вы начинаете со стены Барранко. Самое известное препятствие Килиманджаро, не связанное с вершиной. Вулканический утес высотой 257 метров представляет собой нетехническое сооружение, но снизу выглядит почти вертикальным. Руки и ноги работают вместе над твердыми зацепами из вулканической породы, а ваши гиды наверху помогают на открытых участках. Один-два часа на подъем, необыкновенные виды сверху. Усилия реальны и вознаграждены. Все южное ледяное поле сверкает белым наверху, а внизу уходят равнины Танзании. Это необычно.
На 6-дневном маршруте остановка на ночлег в Каранге не предусмотрена. После Стены вы идете на восток через долину Каранга. Переправа через ручей Каранга под висячими ледниками южного ледяного поля. И продолжайте восхождение. Тропа неумолима через высокогорную пустыню. Во второй половине дня открывается вид на лагерь Барафу (4600 м), расположенный на продуваемом всеми ветрами хребте. Вы приходите уставшими. Ваши гиды проводят подробные брифинги на саммите: время, темп, снаряжение. Ешьте все, что можно, постоянно пейте и ложитесь спать как можно раньше. Будильник установлен на полночь.
Полночь. Ваш гид разбудит вас в темноте и холоде. Вы одеваетесь во все слои. Утепленная основа, флис, утепленная куртка, пуховая парка, подшлемник, плотные перчатки. И выйдите на улицу в небо, сверкающее звездами, на высоте 4600 метров. Ваша фара присоединяется к десяткам других, уже поднимающихся по склону выше. «Полюс-полюс». Шаг за шагом, дыхание за осознанным дыханием. Повороты осыпей неумолимы. Холод сильный. Но ваш гид твердо стоит рядом с вами, регулируя темп, читая ваше тело и поддерживая ваше движение.
После 5-7 часов темноты и усилий вы поднимаетесь на край кратера Стелла-Пойнт (5756 м). Восход солнца над Мавензи. Розовый, золотой и бесконечный. Приветствует вас на вершине неба Африки. Последний рывок: 30 минут по краю кратера мимо высоких ледников к пику Ухуру (5895 м). Знак саммита. Слезы. Тишина. Все, что ты перенес через шесть тяжелых дней, привело тебя сюда. Спуск через Мвеку долгий и беспощадный. Мимо Барафу на обед, затем через альпийскую пустыню до возвращения леса в лагерь Мвека (3100 м). Вы приходите поздно вечером, полностью измотанные, полностью победившие.
Твое последнее утро. Лесная зона встречает вас теплом, пением птиц и насыщенным воздухом. Спуск из лагеря Мвека (3100 м) крутой и иногда грязный, но богатый кислород на меньшей высоте придает силы каждому шагу. Через 3-5 часов ворота Мвека (1640 м). На праздничную церемонию собираются ваши гиды и носильщики. Традиционные песни, танцы, рукопожатия. Ваш официальный сертификат восхождения на Килиманджаро находится в ваших руках. Дорога обратно в Моши прошла тихо, задумчиво и принесла глубокое удовлетворение. Вы поднялись по первоначальному западному маршруту Килиманджаро и достигли самой высокой точки Африки.
Регистрация у ворот Лондоросси, затем путешествие продолжается на автомобиле через национальный парк, поднимаясь через лесную зону по неровной тропе к барьеру Морум (3414 м). Выход на плато Шира — один из самых драматических моментов начала Килиманджаро: весь западный склон горы простирается вперед, а на востоке сразу же виднеется вершина Кибо. Ни на одном другом маршруте Килиманджаро в первый день не открывается такой вид. Или стартует на этой высоте. Ваша команда Senderos Refugio завершает окончательную проверку оборудования, и вы отправляетесь в пустошь и болотистую местность.
День 1 7-дневного варианта идентичен 6-дневному, но у вас другая ментальная позиция. Вы знаете, что в вашем расписании предусмотрен дополнительный день для надлежащей акклиматизации, который снижает психологическое давление, которое может создать высота. Прогулка короткая и пологая: переход по плато длиной 4-5 км до лагеря Шира 1 (3610 м). После полудня ветер усиливается с заходом солнца. Слойтесь заранее. Пить постоянно. Ранний ужин и ранний отход ко сну. Ваше тело достигло высоты без постепенного приближения к лесным маршрутам, и отдых – его самая насущная потребность.
Сегодня вы пересечете древнее сердце плато Шира. Одно из самых первозданных и фотогеничных мест Килиманджаро. Плато представляет собой высокогорную вулканическую кальдеру, обрушившуюся сотни тысяч лет назад. От горизонта до горизонта он простирается во всех направлениях: хребты вулканических пород, открытые пустоши, образования лавы и тишина настоящей дикой природы. Массивный купол Кибо приближается к востоку по мере вашего продвижения. На этой высоте воздух заметно разрежен, а солнце яркое. Солнцезащитный крем и солнцезащитные очки необходимы.
Ширский собор (3750 м) – центральное событие дня. Группа древних вулканических шпилей и контрфорсов резко возвышается над дном плато, их выветренные каменные колонны напоминают руины какой-то огромной естественной крепости. Виды от подножия собора на плато и на Кибо необыкновенны. От собора тропа продолжается до лагеря Шира 2 (3840 м), куда прибывают путешественники по маршруту Лемошо и впервые присоединяются к вам. После двух дней почти одиночества на плато в лагере внезапно стало оживленно. Пульсоксиметрия проверяется вашими гидами. Теплые слои надеваются после захода солнца. Завтрашний день Лавовая башня — самое важное акклиматизирующее мероприятие за весь поход.
Самый важный акклиматизационный день на всем маршруте Шира. Тропа постепенно поднимается на восток от Ширы 2 через высокогорную зону, мимо вулканического образования Зуб Акулы, к западному пролому горы. Вверху видны ледники Северного ледового поля. Драматический, древний и отступающий. Вы поднимаетесь на Лавовую башню (4630 м). Огромная отдельно стоящая вулканическая пробка на высоте почти 4700 метров — одна из самых впечатляющих достопримечательностей Килиманджаро. Обед здесь. Ваше тело сейчас находится на самой высокой высоте.
Маршрут Мачаме сливается возле Башни Лавы. Отсюда лагерь и тропа становятся более оживленными. Затем тропа поворачивает на юг и мощно спускается через лес Сенесио: гигантские крестовники (деревья сенесио) поднимаются из вересковой пустоши доисторическими группами, их огромные розетки направлены ввысь в инопланетном ландшафте, которого больше нигде на Земле не найти. Спуск почти на 700 м к лагерю Барранко (3950 м) завершает цикл «поднимайся высоко, спи низко». Один из самых мощных инструментов горной медицины. Ваша кровь уже производит больше эритроцитов. Лагерь Барранко, расположенный прямо под стеной Барранко, эффектен и красив. Отдыхайте хорошо. Вы это заслужили.
Сегодняшний день начинается со стены Барранко. Один из самых волнующих и знаковых моментов в любом походе на Килиманджаро. Вулканический утес высотой 257 метров выглядит невероятно крутым из лагеря Барранко, но восхождение следует по блестящему естественному маршруту с использованием твердых вулканических скал и нетехническим подъемом, требующим рук и ног. Ваши гиды располагаются выше, чтобы помочь на наиболее уязвимых участках. Работа занимает 1-2 часа. Виды сверху захватывают дух: наверху светится все южное ледяное поле, далеко внизу долина Барранко, простирающиеся до бесконечности равнины Танзании.
От вершины Стены тропа идет на восток через ряд хребтов и долин вдоль Южного контура, под впечатляющими ледниками Хейм, Керстен и Декен южного ледяного поля Килиманджаро. Эти ледники видны с необычайной близости. Достаточно близко, чтобы почувствовать холод, исходящий от льда над вами. Ущелье долины Каранга пересекается перед заключительным коротким подъемом в лагерь Каранга (4000 м). Меньший и более уютный лагерь, чем Барранко, расположенный прямо под ледниками. Эта ночь станет решающим акклиматизирующим преимуществом 7-дневного маршрута: еще одна ночь на умеренной высоте перед финальным рывком к Барафу. Ваше тело прекрасно адаптируется. Завтра последний шаг перед саммитом.
Короткий, сосредоточенный день. Тропа поднимается из Каранги через высокогорную пустыню. Голые вулканические осыпи, разреженный воздух, широкие виды. Вы проезжаете перекресток со спусковой тропой Мвека перед финальным подъемом в лагерь Барафу (4600 м) и прибываете ближе к полудню, чтобы максимально увеличить время отдыха до полуночного старта. Барафу суров и ветрен. «лед» на суахили, полученный благодаря минусовым ночам, которые наступают здесь быстро после наступления темноты.
Ваши гиды проводят полные брифинги на вершине: точное время, стратегия темпа, чего ожидать на каждом высотном диапазоне, гидратация и питание во время подъема и протоколы действий в чрезвычайной ситуации. Упакуйте слои вершины по порядку. Сначала термобаза, потом саммит, перчатки и балаклава доступны сразу. Ешьте полноценно, несмотря на то, что высота подавляет аппетит. Установите два будильника и постарайтесь лечь спать как можно раньше. Через несколько часов на темных склонах над головой начинается приключение на всю жизнь.
Полночь. Тревога. Холод. Вы встаете из спального мешка и методично одеваетесь. Каждый слой происходит в правильной последовательности. И выйдите на улицу и погрузитесь в небо невозможных звезд на высоте 4600 метров. Ваш фара находит первую из тысяч ступенек вверх. Над вами, во тьме, где-то недостижимо далеко, ждет пик Ухуру. Ваш гид задает темп. Намеренно, мучительно медленно. «Полюс-полюс». Один шаг. Одно дыхание.
Осыпные холмы южного склона поднимаются час за часом. Холод усиливается по мере увеличения высоты. Ваш гид регулярно проверяет вас. Гидратация, дыхание, пальцы рук и ног. Вы продолжаете двигаться. После 5-7 часов темноты на фоне неба появляется край кратера Стелла-Пойнт (5756 м), когда первый свет рассвета сверкает оранжевым и розовым над пиком Мавензи на востоке. Восход солнца на вершине Африки — зрелище, которое навсегда меняет людей. Затем последние 30 минут по краю кратера. Мимо огромных остатков древних ледников Килиманджаро. На пик Ухуру (5895 м). Самая высокая точка Африки. Знак саммита. Все, над чем вы работали дни и месяцы, приходит сюда. Этот момент твой навсегда.
Сразу после этого начинается спуск через Мвеку. Долго и беспощадно. Барафу на обед, затем через альпийскую пустыню, пока лес не вернется и воздух не станет теплым и насыщенным. Лагерь Мвека (3100 м) встретит вас ближе к вечеру. Сон приходит засветло.
Ваше последнее утро на Килиманджаро. Болит каждая мышца, каждый шаг — вниз, а воздух становится насыщеннее с каждым метром спуска. Лесная зона закрывается вокруг вас. Тепло, пение птиц и запах земли после дней, проведенных на голых вулканических скалах и льду. Через 3-5 часов ворота Мвека (1640 м). На церемонию собираются ваши гиды и носильщики: песни, танцы, гордые рукопожатия, смех. Ваш официальный сертификат восхождения на Килиманджаро. Золото для тех, кто стоял на пике Ухуру. Представлен.
Обратный путь в Моши проходит тихо и тепло и приносит полное удовлетворение человеку, сделавшему что-то действительно значительное. Вы поднялись по первоначальному западному маршруту Килиманджаро. Маршрут, который предшествовал Лемошо, который принес славу плато Шира, начинается на высоте, которую большинство альпинистов достигают только на третий день. И вы стояли на крыше Африки. Гора не изменилась. Ты не.
НочьОстанавливается
| Лагерь | Высота | Зона | Ночь | Примечания |
|---|---|---|---|---|
| Лагерь Шира 1 (Лагерь Симбы) | 3610 м | Пустошь/Плато | Ночь 1 (оба) | Доступен после поездки на транспортном средстве к барьеру Морум; выход на плато; Кибо виден сразу; высота с первого дня |
| Лагерь Шира 2 | 3840 м | Морланд/Плато | Ночь 2 (оба) | После Ширинского собора; Здесь соединяется маршрут Лемошо; переход через плато завершен |
| Лагерь Барранко | 3950 м | Альпы/Долина | Ночь 3 (обе) | После Лавовой башни (4630 м) день «забирайся высоко, спи низко»; Маршрут Мачаме сливается; под стеной Барранко и южными ледниками |
| Лагерь Каранга | 4000 м | Альпийская пустыня | Ночь 4 (7 дней) · Пропущено на 6-й день | После стены Барранко; под южными ледниками; критическая акклиматизационная ночь; последняя точка с водой перед Барафу |
| Лагерь Барафу | 4600 м | Арктика / Альпийская пустыня | Ночь 4 (6 дней) · Ночь 5 (7 дней) | Базовый лагерь на вершине; все южные маршруты сходятся; наиболее уязвимый лагерь; полуночный выезд |
| Пик Ухуру | 5895 м | Саммит / Арктика | Н/Д | Через Стелла-Пойнт (5756 м); восхождение на южную осыпь; Самая высокая точка Африки |
| Лагерь Мвека | 3100 м | Верхний Лес | Ночь 5 (6 дней) · Ночь 6 (7 дней) | Спусковой лагерь после вершины; лесные возвраты; вчера вечером на горе; спуск по маршруту Мвека |
| Ворота Мвека (выход) | 1640 м | Лес | Н/Д | День 6 (6-дневный) / День 7 (7-дневный); сертификат саммита; праздник экипажа; трансфер в Моши |