Price per Person
1 Person$ 2,271
2 Persons$ 1,877
3 Persons$ 1,739
4 Persons$ 1,670
5 Persons$ 1,676
6 Persons$ 1,628
The 6-day Shira Route — Kilimanjaro's original western approach. Drive to 3,414m, cross the ancient Shira Plateau, tackle the Barranco Wall and push to Uhuru Peak (5,895m) in six powerful days.
The Shira Route is Kilimanjaro's original western approach. The predecessor to the now more popular Lemosho Route and one of the least-travelled trails on the mountain. Where the Lemosho begins in the dense rainforest at Londorossi Gate, the Shira takes a different path: after registration at Londorossi, you continue driving through the national park all the way to Morum Barrier (also called Shira Gate) at 3,414m. The rainforest is left behind through the windscreen. You step out onto the Shira Plateau already at significant altitude, with the full sweep of the moorland and Kibo's dome ahead of you from the very first steps.
This is both the Shira Route's defining character and its primary challenge. The plateau is extraordinary. Ancient, volcanic, vast and beautiful. But arriving here so quickly without the gradual rainforest acclimatization means your body is immediately exposed to significant altitude. Days 1 and 2 are spent crossing this magnificent plateau past the dramatic spires of Shira Cathedral (3,750m) to Shira 2 Camp (3,840m), where the route merges with the Lemosho and soon after with the Machame Route. From Day 3 onward, the routes are identical: the powerful "climb high, sleep low" day to Lava Tower (4,630m) and down to Barranco, the thrilling Barranco Wall scramble, the Southern Circuit traverse beneath the southern glaciers, Barafu Camp and the midnight summit push to Uhuru Peak (5,895m). Descent is via the Mweka Route.
The reward for those who are prepared: two days of almost complete solitude on one of Kilimanjaro's most scenic plateaus, followed by the full drama of the southern circuit. The Shira Route suits experienced trekkers who want a quiet, dramatic western approach and are willing to manage the higher-altitude start carefully. The 7-day option. With its Karanga Camp overnight. Is strongly recommended for everyone.
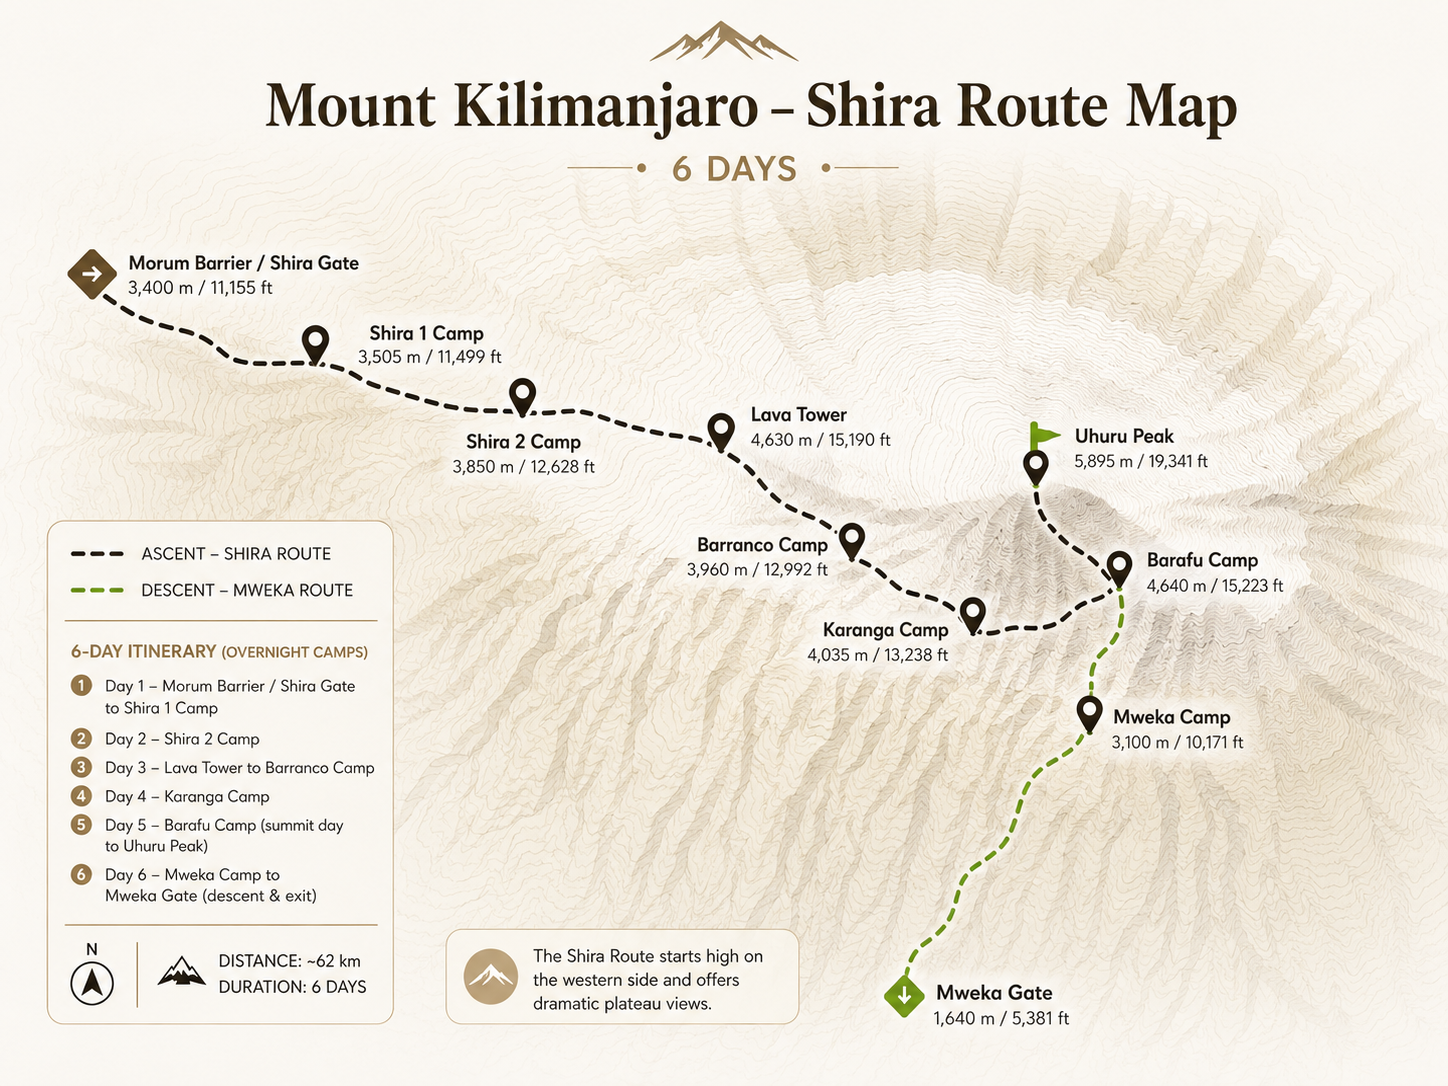
Your Shira Route begins differently from almost every other Kilimanjaro climb: you don't walk to the trailhead. You drive there. After registration formalities at Londorossi Gate, the 4x4 vehicle continues through the national park on a steep, sometimes rough track, climbing through the forest zone without stopping, past the Morum Barrier at 3,414m where you park and begin on foot. For many climbers, stepping out of the vehicle here. Already at over 3,400 metres, with the vast Shira Plateau spreading out ahead and the summit of Kibo visible above. Is one of Kilimanjaro's most dramatic first impressions.
The walk itself on Day 1 is relatively short and gentle. A 4-5km traverse through heath and moorland on the western plateau, with wide open views in every direction. Giant heathers and volcanic rock formations line the path. The altitude is immediately noticeable: the air is thin, the sun is strong and the wind can be cold. After just 2-3 hours you arrive at Shira 1 Camp (also known as Simba Camp) at 3,610m. Your first night on the mountain, already higher than most routes reach on Day 3. Hydrate aggressively, eat a full dinner and rest carefully. The altitude is real from the very first evening.
Today you cross the heart of the Shira Plateau. One of Kilimanjaro's most ancient and dramatic landscapes. The plateau was once a third volcanic peak, collapsing inward hundreds of thousands of years ago into the vast open caldera you now traverse. The trail winds east across volcanic rock, lava ridges and open moorland with increasingly clear views of Kibo's summit looming to the east. The sky is enormous here. There is almost no vegetation taller than your knee.
The centrepiece of the day is Shira Cathedral (3,750m). A magnificent cluster of volcanic rock spires and buttresses rising from the plateau floor, surrounded by pinnacles of ancient lava. It is one of the three peaks of Kilimanjaro and a world of its own to explore. From the Cathedral, the trail continues east to Shira 2 Camp (3,840m). Where the Lemosho Route trekkers arrive on their Day 3. For the first time on the Shira Route, you have company in camp. Guides run a thorough altitude check for everyone. Afternoon mist often rolls in on the plateau. Layer up after dinner and sleep as early as possible.
This is the defining acclimatization day of the Shira Route. A day that works powerfully in your favour if you let it. The trail climbs steadily east from Shira 2, leaving the plateau behind and entering the high alpine zone beneath the Western Breach glaciers. A dramatic waypoint early in the day is the Shark's Tooth, a striking volcanic spire. The path climbs through sparse high-altitude vegetation to Lava Tower (4,630m). An enormous volcanic plug rising from the scree and one of Kilimanjaro's most iconic landmarks.
Lunch at Lava Tower. At 4,630m, your body is experiencing its highest altitude yet. And this is deliberate. Near the Tower, the Machame Route trekkers merge from the south and the trail becomes shared from here onward. Then. Instead of pushing higher. The trail turns south and descends steeply and beautifully through the extraordinary Senecio Forest: giant groundsels rising prehistoric from the moorland in dense clusters. The descent of nearly 700 metres to Barranco Camp (3,950m) is pure altitude physiology in action. "Climb high, sleep low." Your red blood cell production is working hard. Tonight, your body is more acclimatized than it would have been without this day. Barranco Camp sits dramatically beneath the Barranco Wall.
On the 6-day route, today is the mountain's longest and most demanding day. You begin with the Barranco Wall. Kilimanjaro's most famous non-summit obstacle. The 257-metre volcanic cliff is a non-technical scramble but looks nearly vertical from below. Hands and feet work together over solid volcanic rock holds, with your guides above to assist at exposed sections. One to two hours to ascend, extraordinary views from the top. The effort is real and the reward. The entire southern ice field blazing white above, Tanzania's plains dropping away below. Is extraordinary.
On the 6-day route, there is no overnight stop at Karanga. After the Wall, you traverse east across the Karanga Valley. Crossing the Karanga stream beneath the hanging glaciers of the southern ice field. And keep climbing. The trail is relentless through the high alpine desert. Barafu Camp (4,600m) comes into view in the afternoon, perched on a windswept ridge. You arrive tired. Your guides run comprehensive summit briefings: timing, pacing, gear. Eat everything you can, drink constantly and sleep as early as possible. The alarm is set for midnight.
Midnight. Your guide wakes you in darkness and cold. You dress in every layer. Thermal base, fleece, insulated jacket, down parka, balaclava, heavy gloves. And step outside into a sky blazing with stars at 4,600m. Your headlamp joins dozens of others already moving up the slope above. "Pole pole." Step by step, breath by deliberate breath. The scree switchbacks are relentless. The cold is profound. But your guide is steady beside you, adjusting pace, reading your body, keeping you moving.
After 5-7 hours of darkness and effort, you crest the crater rim at Stella Point (5,756m). The sunrise over Mawenzi. Pink, gold and infinite. Greets you at the top of Africa's sky. The final push: 30 minutes along the crater rim past towering glaciers to Uhuru Peak (5,895m). The summit sign. The tears. The silence. Everything you carried through six hard days brought you here. The descent via Mweka is long and relentless. Past Barafu for lunch, then through the alpine desert until the forest returns at Mweka Camp (3,100m). You arrive late afternoon, completely spent, completely victorious.
Your final morning. The forest zone welcomes you back with warmth, birdsong and rich air. The descent from Mweka Camp (3,100m) is steep and sometimes muddy but the rich oxygen at lower altitude reinvigorates every step. After 3-5 hours, Mweka Gate (1,640m). Your guides and porters gather for the celebration ceremony. Traditional songs, dancing, handshakes. Your official Kilimanjaro Summit Certificate is placed in your hands. The drive back to Moshi is quiet, reflective and deeply satisfying. You climbed Kilimanjaro's original western route and reached Africa's highest point.
Final selling price per person in USD.
| Camp | Altitude | Zone | Night | Notes |
|---|---|---|---|---|
| Shira 1 Camp (Simba Camp) | 3,610m | Heath / Plateau | Night 1 (both) | Reached after vehicle drive to Morum Barrier; plateau entry; Kibo visible immediately; altitude from Day 1 |
| Shira 2 Camp | 3,840m | Moorland / Plateau | Night 2 (both) | After Shira Cathedral; Lemosho Route joins here; plateau crossing complete |
| Barranco Camp | 3,950m | Alpine / Valley | Night 3 (both) | After Lava Tower (4,630m) "climb high, sleep low" day; Machame Route merges; beneath Barranco Wall & southern glaciers |
| Karanga Camp | 4,000m | Alpine Desert | Night 4 (7-day ) · Skipped on 6-day | After Barranco Wall; beneath southern glaciers; critical acclimatization night; last water point before Barafu |
| Barafu Camp | 4,600m | Arctic / Alpine Desert | Night 4 (6-day) · Night 5 (7-day) | Summit base camp; all southern routes converge; most exposed camp; midnight departure |
| Uhuru Peak | 5,895m | Summit / Arctic | N/A | Via Stella Point (5,756m); southern scree ascent; Africa's highest point |
| Mweka Camp | 3,100m | Upper Forest | Night 5 (6-day) · Night 6 (7-day) | Post-summit descent camp; forest returns; last night on mountain; descent via Mweka route |
| Mweka Gate (exit) | 1,640m | Forest | N/A | Day 6 (6-day) / Day 7 (7-day); summit certificate; crew celebration; transfer to Moshi |
Our team at Haven Trails Adventures will reach out within 24 hours to confirm your expedition and share your personalised itinerary.